How To Remove Wire Pins From Push-In Automotive Connectors
This video features L64A2, a 2-pin electrical connector most commonly used for these fitments and functions:
- AC Compressor
- Ambient Temperature
- Daytime Running Lamp
- Fog Lamp
- Keyless Entry Antenna


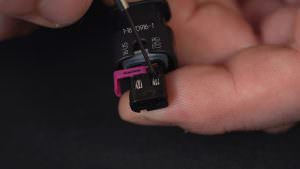
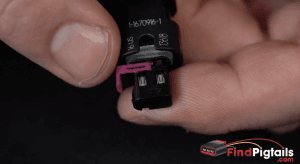
L64A2: 2-Pin AC Compressor, Fog Lamp Connector
Save severity, cycle time and money by learning how to depin and repin your own automotive connectors. Check out our educational videos, here.


Step 1
Remove the front face of the automotive connector. What's the front face? It's the front plastic piece on a connector, that once removed provides you with direct access to the openings containing the catches or the locking mechanisms that release the terminals.

Step 2
Locate the catch. See the photo to the left? This is Z27C2 and we're using this photo as an example to identify the catch because it's very easy to see. But, either way each pigtail will have its own unique catch. The catch is what you need to pry up, down or away on in order to release the terminals and wires from the backside of the connector.
Depinning an automotive electrical connector is the process (some may call it an art) of removing the pins or terminals from a connector. Sometimes it can be a simple process. But other times it can be quite difficult.
Why?
Because each connector has its own features. For example, a connector like Z27C2 has an easy-to-access catch (see above for details on what "the catch" is) whereas L64A2 and D81B3 actually have their catch built in.
So what makes the depinning process different?
To release the catch on an automotive connector like Z27C2, the most common fog lamp and headlight connector for vehicles like Honda, Toyota, and Lexus you just simply pry away on it with a mini screwdriver.
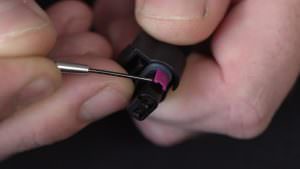
Other connectors like L64A2 (also fog lamp, ac compressor, and ambient temperature) have a catch that is built in. So in order to release the pins in this automotive connector, you have to push down on the actual catch to release the terminals.
Once you locate the catch and determine how you need to release the pins (push or pry) it's time to actually release them.
Important: Make sure you have a good set of automotive connector depin release tools or a good mini screwdriver set.
Here are some of our favorites...
When you start to release the pins, use care. These catches are small plastic pieces that can easily break.
When you being to pry on the catch you'll be creating a separation or releasing the lock holding the pins and wires in place.
As you make your pry with one hand, use the other hand to pull the wires from the rear of the connector out. This can be difficult sometimes so it may be helpful to use some sort of extra grip to hold the connector down on a table, freeing up both hands to do this simultaneous operation.
So as you pull the wires out do so gently to make sure they come out easy. It shouldn't be too difficult to remove the wires and pins because your other hand still has the catch in a pry position, releasing the lock.
A common mistake people sometimes make is unlocking the release (prying on the catch) and then letting go. You CANNOT do this. When removing the wires and pins from the rear of the automotive connector, it's important to note that you still NEED to be prying on the catch with your other hand at the same time. The second you release your pry, the catch will lock back in place. This is where we've seem some damage occur.
A common misconception has been that once you perform your pry on the catch, that that part is done. They don't realize that you have to keep this process and step going while at the same time utilizing your other hand to pull the terminals and wires out.

Re-pinning your automotive connector is simple but it's not without caution.
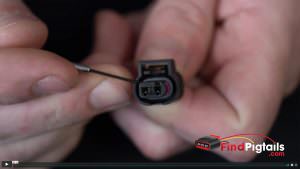
To repin your connector, it's as simple as inserting the terminals back into place. However, please make sure you are inserting them the right way.
Do not force the terminals back into place.
Listen for a CLICK.
If you attempt to insert the pins back into the connector the wrong way you'll notice a little pressure or kick back.
You'll know that your correctly reinserted the terminals back when you hear a light click. This is the catch mechanism locking back in place, locking the pins back into the proper position.
Once you hear clicks on all terminals that you've reinserted, perform a gently pull test. Carefully pull on the wires to assure that they do not easily come out.